I love the kitchen. I love Saturdays to myself when I can put on NPR and pretend I'm a stay-at-home mom or a homesteader wife. When I am responsible for making food for our family. Food is so different than it used to be. Women (and men, yes) used to make everything. And grow and raise and harvest and milk to get their food. There weren't always grocery stores down the street, there was a garden out back. And a cow in the pasture. I dream of those days, of growing my own food and supporting our family with food that we worked for, not what was brought home from Trader Joe's and QFC.
But. I work full time. I am the primary provider for our family; right now it's not an option to not work full time. More and more, I am resorting to quick meals or canned pasta sauce or microwave lunches, and being ok with that. It's not an option for us to buy a cow and raise chickens and make my own milk. It's just not. So I do what I can, when I can. And dream of the day we live on a farm and our food lives outside our door. Maybe that day will come. But until then, I'll spend some Saturdays cooped up with Peter Sagal as I make in my kitchen.
Dairy has been my focus over the past couple kitchen dates. I made my own cottage cheese a couple weeks ago, then made some yogurt this weekend. It's a little thinner than store-bought, but tasty and easy with a crockpot. We've also been regularly making yogurt cheese (aka strained yogurt or greek yogurt). Even easier! All you do is put some yogurt in a piece of muslin (You can use cheesecloth but use a couple layers--you don't want chunks to get through), tie up the corners and let it hang overnight. Catch the whey in a bowl and use it in smoothies, soup, or drink it straight. It's apparently pretty good for you, and adds a little tang. I froze a bunch in ice cube trays and used it in a smoothie, then used the rest in some bean soup. My favorite use for the cheese is to put it on toast with some jam.
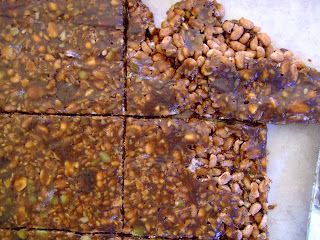
I've been wanting to make my own energy bars for some time now, and that time finally came this past weekend. A patient brought this recipe to me (I need a whole new file for all the recipes I seem to collect from patients!). Her kids love it. It's quick, easy, and if you have a well-stocked pantry may even take ingredients you already have on hand. And you can make it all your own. I rustled up some almonds, sesame seeds, flax seeds, hazelnuts, and pumpkin seeds, and raisins for mine.
I didn't have enough peanut butter, so I made some sunflower butter in the food processor (this page helped me out; I thought it would never turn into butter but she gave me peace of mind! I didn't add anything to mine though).
I didn't roast my seeds and nuts first, which would be something to try. I used molasses as my sweetener; combined with sweetened raisins, the boy and I agree that it was too sweet. Next time it will be less molasses or just unsweetened fruit. We also think that adding orange zest and cranberries, or dates and ginger would be something to explore.
Energy Bar
Prep time: 20 minutes
Cook time: 5 minutes
Total time: 25 minutes
3/4 cup nut butter (almond or cashew or peanut or sunflower...you get the picture)
3/4 cup sweetener syrup (honey or brown rice syrup or agave; I used molasses)
1 1/2 cups roasted raw nuts or seeds
1 cup unsulfured dried fruit
4 cups gluten-free brown rice crispies cereal (I used EnviroKids Koala Crisp)
1/8 tsp salt
1 tsp vanilla extract- Line a large baking sheet with parchment paper
- Place nuts and/or seeds and dried fruit in the bowl of food processor. Pulse several times, just until the mixture is coarsely ground.
- In a large saucepan, melt nut butter with liquid sweetener over medium low heat. Stir and watch carefully to prevent scorching. When the mixture is smooth and bubbling, cook for about 1 minute. Remove from heat. Add salt and vanilla and stir to combine. Use a large spatula to stir in nuts, dried fruit, and cereal. Stir until all ingredients are coated with nut butter mixture. (Don't forget the cereal--I did and had to roll the rice in later.)
- Scrape mixture on to the prepared baking sheet. Use the spatula to evenly spread the mixture on the pan. Place a large piece of waxed paper over the mixture and use a rolling pin to smooth the top of the mixture. Cover with the waxed paper and refrigerate for about 2 hours before cutting the bars.
- Wrap bars in waxed paper and store in a covered container in the refrigerator.
Yield: about 16-32 bars depending on how they are cut.
(According to her notes on the recipe, she figures that the bars cost about 36c each. Much better than a Lara bar, and dare I say just as tasty!) Leave a comment if you make them and find some killer combination of ingredients!


I need to try that cottage cheese! Yum. I was just daydreaming today about being a homesteader...we still need to have a domestic day!
ReplyDelete